
Load balancing of nginx
Note: As you can see, because our website is in the early stage of development, nginx only represents one server at the back end. However, due to the increasing popularity of our website, one server can't stand it, so we added more servers. How can we configure the proxy for so many servers? We will take two servers as examples to demonstrate for you.
1. Description of 1.upstream load balancing module
Case:
Set the load-balanced server list below.
upstream test.net{ip_hash; server 192.168.10.13:80; server 192.168.10.14:80 down; server 192.168.10.15:8009 max_fails=3 fail_timeout=20s; server 192.168.10.16:8080; }server { location / { proxy_pass http://test.net ; }}
Upstream is the http upstream module of nginx, which realizes the load balancing from the client ip to the back-end server through a simple scheduling algorithm. In the above settings, the name of a load balancer, test.net, is specified through the upstream instruction. This name can be arbitrarily specified, and it can be called directly where it is needed later.
2. Load balancing algorithm supported by 2.upstream
Nginx's load balancing module currently supports four scheduling algorithms, which are introduced respectively below, and the last two of them belong to the third-party scheduling algorithm.
Polling (default). Each request is assigned to a different backend server one by one in chronological order. If a backend server goes down, the failed system will be automatically eliminated, so that user access will not be affected. Weight specifies the polling weight. The greater the weight value, the higher the access probability assigned to it, which is mainly used when the performance of each server in the back end is uneven.
ip_hash。 Each request is allocated according to the hash result of ip access, so that visitors from the same ip can access a back-end server, which effectively solves the session sharing problem in dynamic web pages.
fair。 This is a more intelligent load balancing algorithm than the above two. This algorithm can intelligently balance the load according to the page size and loading time, that is, the request is allocated according to the response time of the back-end server, and the short response time is given priority. Nginx itself does not support fair. If you need to use this scheduling algorithm, you must download the upstream_fair module of nginx.
url_hash。 This method allocates requests according to the hash results of visited urls, so that each URL is directed to the same back-end server, which can further improve the efficiency of the back-end cache server. Nginx itself does not support url_hash. If you need to use this scheduling algorithm, you must install nginx's hash package.
3. Status parameters supported by 3.upstream
In the http upstream module, you can specify the ip address and port of the back-end server through the server instruction, and you can also set the status of each back-end server in load balancing scheduling. Commonly used states are:
Down means that the current server will not participate in load balancing temporarily.
Backup, the reserved backup machine. Only when all other non-standby machines fail or are busy will requests be sent to the standby machine, so the load on the standby machine is the lightest.
Max _ failures, the number of times the request max_fails is allowed, and the default value is 1. If the number of times exceeds the maximum number, an error defined by the proxy_next_upstream module will be returned.
After many failures (max _ failures), the service will be suspended for a period of time and trigger fail_timeout. Max _ failures can be used with fail_timeout.
Note: When the load scheduling algorithm is ip_hash, the status of the back-end server in load balancing scheduling cannot be weight and backup.
4. Experimental topology
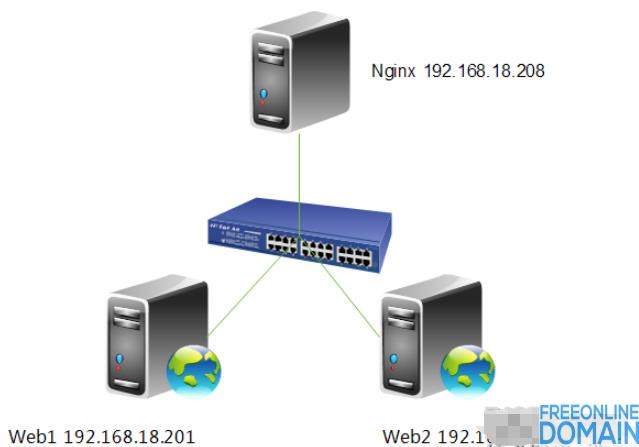
5. Configure nginx load balancing

Note: You can constantly refresh the browsing content, and you can find that web1 and web2 appear alternately, achieving the effect of load balancing.
8. Check the web access server log.
web1:
Note, as you can see, you can only access web2 now, then restart web1 and visit it again.

Note, as you can see, you can visit again now, which shows that nginx's health status check configuration is successful. But let's think about it. What if unfortunately all servers can't provide services? When users open the page, there will be an error page, which will reduce the user experience. So can we configure sorry_server like configuring lvs? The answer is yes, but here we are not configuring sorry_server, but configuring backup.
12. configure the backup server
Note, as you can see, when all servers fail, the backup server will be started. Ok, the backup server is configured here. Let's configure ip_hash load balancing.
15. configure ip_hash load balancing.
Ip_hash, each request is allocated according to the hash result of accessing ip, so that visitors from the same ip can access a backend server permanently, which effectively solves the problem of session sharing in dynamic web pages. (Generally, e-commerce websites are used more)
Note, as you can see, you keep refreshing the web2, which shows that the ip_hash load balancing configuration is successful. Let's count the number of visits to web2.
18. Count the number of access connections of web2.
[root@web2 ~]# netstat -an | grep :80 | wc -l304
Note, if you keep refreshing, the number of connections will increase.
Copyright Description:No reproduction without permission。

Knowledge sharing community for developers。
Let more developers benefit from it。
Help developers share knowledge through the Internet。
Follow us


 Español
 Português