This article brings you a beginner's introduction to Laravel Dusk console (code example), which has certain reference value. Friends who need it can refer to it and hope to help you. Laravel Dusk Console is an extension package of Laravel, which can provide beautiful visual panels for your Dusk test suite. Through it, you can visualize the steps involved in running Dusk tests and view DOM snapshots of each step. This is very useful for debugging browser tests and figuring out what is done in the background. At the same time, you can also use the browser's debugging tools to check DOM snapshots.
In addition to the visual panel, this expansion pack also provides Laravel Dusk test monitor. After you modify the Dusk test, the test process will be automatically executed.
The expansion package is strongly inspired by Cypress, a Javascript front-end testing framework.
To view this expansion pack, please go to GitHub.
What is Laravel Dusk?
Laravel Dusk provides an expressive and easy-to-use browser automation and testing API. Write test cases in Laravel Dusk, just like in a real browser. For example, when you want to test the drag-and-drop function on a website and want to test Vue components or other Javascript-related functions, then you can't use Laravels HTTP test API itself for testing.
I think Laravel Dusk is a great software package and can simplify browser testing. The following is a sample test of user registration, so that you can understand the function of Laravel Dusk:
public function test_can_register() { $faker = Factory::create(); $this->browse(function($browser) use ($faker) { $password = $faker->password(9); $browser->visit('/register') ->assertSee('Register') ->type('name', $faker->name) ->type('email', $faker->safeEmail) ->type('password', $password) ->type('password_confirmation', $password) ->press('Register') ->assertPathIs('/home'); }); }
To learn more about Laravel Dusk and how to start testing with your own browser, please check the official documentation.
Using Laravel Dusk console
Before introducing the internal operation of Laravel Dusk console, let's take a look at how to install and use this expansion package in Laravel application.
The following steps assume that you have successfully installed Laravel Dusk; according to the official documents; Or even you have written some Dusk tests.
First, use Composer to install this expansion pack.
composer require --dev beyondcode/dusk-dashboard
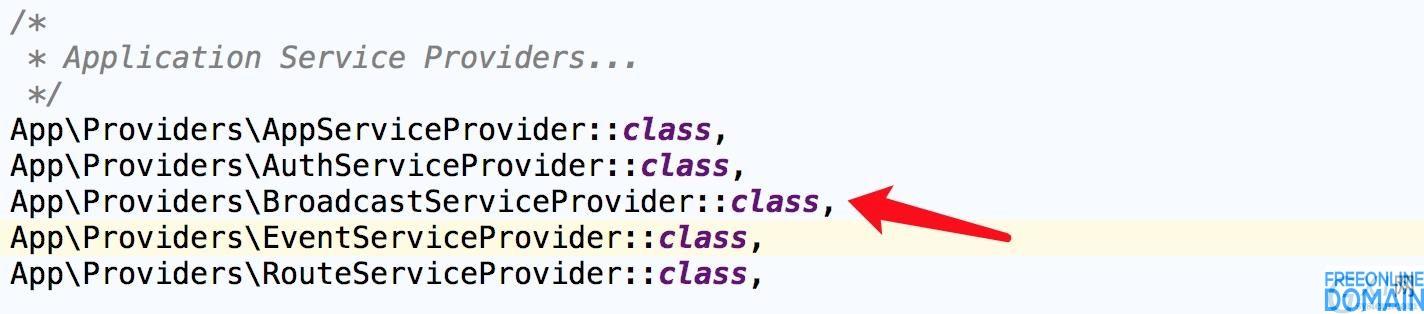
Next, open the DuskTestCase.php generated by Laravel Dusk. You can find this file in the tests directory.
Be sure to use the Test case of this extension package as the base class, not the test case of Laravel Dusk. I'll tell you the internal principle later.
Find this line:
use Laravel\Dusk\TestCase as BaseTestCase;
Replace with the following:
use BeyondCode\DuskDashboard\Testing\TestCase as BaseTestCase;
Done.
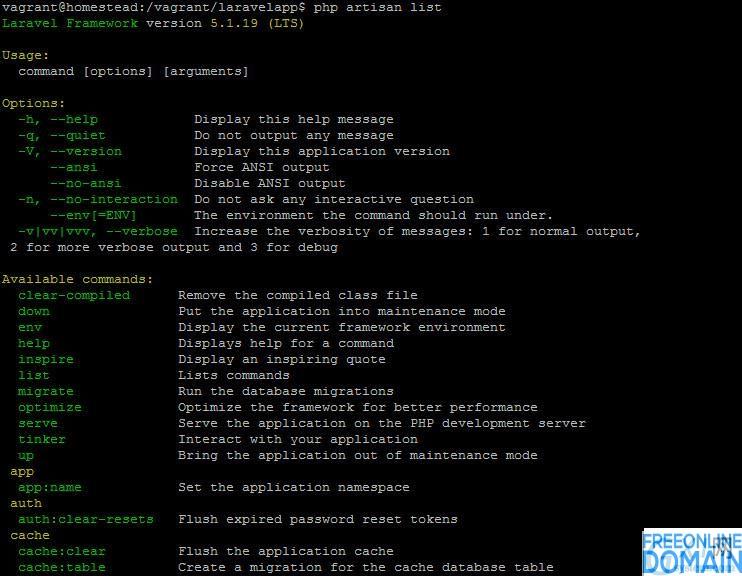
Now you can use the following command to start the Laravel Dusk console and perform your test.
php artisan dusk:dashboard
An interface like this will be displayed in front of you:
Just press the "Start Tests" button to start the test, you can run the Laravel Dusk test, and observe the output and behavior of your application when it is tested.
Then, you will see various events generated by the Dusk test appear on your console.

Another way to start the Dusk test is to edit any test file and save it. The Laravel Dusk console has a built-in file monitor.
Debugging Test Steps You can debug and check the test behaviors shown in the list by clicking on them. After clicking, you will see a DOM snapshot, indicating the state of the HTML page when this behavior is recorded. If this behavior has manipulated the DOM in some way, you can also click the "Before" and "After" buttons to switch between DOM snapshots before or after the event.
Here is a small example of pressing the "Register" button:

Checking XHR requests Sometimes, it may be useful to view other information about XHR requests that happened when you ran the test. For example, there is another button on your website, which will execute a GET request on a server.
Dusk Dashboard allows you to record XHR events and display the response status and response path.

By default, XHR request checking will not be enabled because it requires you to modify the browser function.
To enable XHR request logging, open your DuskTestCase.php. In the file, there is a driver method to set the WebDriver for different test operations. Because this package needs to adjust the function of this driver, you need to use the $this->enableNetworkLogging method call to encapsulate the DesiredCapabilities object.
protected function driver() { $options = (new ChromeOptions)->addArguments([ '--disable-gpu', '--headless', '--window-size=1920,1080', ]); return RemoteWebDriver::create( 'http://localhost:9515', $this->enableNetworkLogging( DesiredCapabilities::chrome()->setCapability( ChromeOptions::CAPABILITY, $options ) ) ); }
By adding this feature, the package will enable the functions required to record XHR request and response information.
principle of operation
The basic idea is very simple: run a WebSocket service, the console user connects to this WebSocket service, and then PHPUnit will send browser events and failure messages to all WebSocket connections.
The following is the specific implementation:
Internally, this expansion pack adds a command called StartDashboardCommand to your Laravel application. When this command is executed, a WebSocket service developed by Ratchet will be started. At first, I thought about implementing this function based on Laravel Websockets that I developed with Freek, but then I killed the idea. The reason is simple, this expansion package can only be used as a development dependency, and I don't need the Pusher or Laravel broadcast function, because the broadcast is implemented internally through PHPUnit.
Translator's note: Freek means Freek Van der Herten. In addition, up to now, this expansion package has also released a stable version of v1.0.x Next, I add two routes to the WebSocket service.
$dashboardRoute = new Route('/dashboard', ['_controller' => new DashboardController()], [], [], null, [], ['GET']); $this->app->routes->add('dashboard', $dashboardRoute); $eventRoute = new Route('/events', ['_controller' => new EventController()], [], [], null, [], ['POST']); $this->app->routes->add('events', $eventRoute);
$dashboardRoute is an ordinary HTTP controller route, which is used to output the HTML view of Laravel Dusk console.
It's as simple as that. It only does one thing-it returns to the HTML view:
class DashboardController extends Controller { public function onOpen(ConnectionInterface $connection, RequestInterface $request = null) { $connection->send( str(new Response( 200, ['Content-Type' => 'text/html'], file_get_contents(__DIR__.'/../../../resources/views/index.html') )) ); $connection->close(); } }
The $ TERM route is also an HTTP route, but only POST requests are allowed. It is used to communicate between PHPUnit and WebSocket clients.
It is also very simple, and it only does one thing-receiving POST data and broadcasting it to all connected WebSocket clients:
class EventController extends Controller { public function onOpen(ConnectionInterface $conn, RequestInterface $request = null) { try { /* * the following is the POST data sent from the PHPUnit test. * sent to the connected client. */ foreach (Socket::$connections as $connection) { $connection->send($request->getBody()); } $conn->send(str(new Response(200))); } catch (Exception $e) { $conn->send(str(new Response(500, [], $e->getMessage()))); } $conn->close(); } }
Collecting browser behavior is the most boring part of the whole expansion package. Because if you want to collect all Laravel Dusk methods and broadcast them to WebSocket connection, you must proxy all the messages and collect them again.
In the TestCase class defined by this extension package, we can override the process of creating a browser instance. So, this is where I inject the custom Browser class. It is responsible for proxying existing methods and collecting all behaviors, and forwarding them to WebSocket connections.
protected function newBrowser($driver) { return new Browser($driver); }
There is no high-end operation. Next, I originally wanted to create a new class directly, pass it to Laravel Dusk's browser class, and then use __call magic method to proxy all methods. This can save a lot of code, but it also leads to two problems:
Users can't use the IDE's auto-completion and method prompt functions.
It's a little unbearable for me, and I think this is a very important feature-especially for testing tools. Developers don't know the input and output of API, so they need hints from IDE.
Another problem is that I don't just want to take a DOM snapshot after browser behavior happens, but I also want to take a snapshot before certain behaviors happen.
So that's why I have to proxy all Laravel Dusk methods as follows:
/** @inheritdoc */ public function assertTitle($title) { $this->actionCollector->collect(__FUNCTION__, func_get_args(), $this); return parent::assertTitle($title); }
Ok, so I can collect and record various behaviors and still maintain the IDE auto-completion function. great!
Now you can see that the actionCollector here is a bridge between PHPUnit and WebSocket client. It collects the obtained information and enriches it with endpoint data pushed by, for example, test names and WebSocket POST:
protected function pushAction(string $name, array $payload) { try { $this->client->post('http://127.0.0.1:'.StartDashboardCommand::PORT.'/events', [ RequestOptions::JSON => [ 'channel' => 'dusk-dashboard', 'name' => $name, 'data' => $payload, ], ]); } catch (\Exception $e) { // Dusk-Dashboard server may be down. Don't panic. } }
It is wrapped by try-catch to ensure that Laravel Dusk can run normally even when the Dusk Dashboard server is shut down.
UI interface finally, it is worth noting that this expansion pack also has a lot to say in its panel interface. It is driven by TailwindCSS and Vue to show incoming events, filter them and so on. You can check the code of the start page here.
That's about it.
Copyright Description:No reproduction without permission。
Knowledge sharing community for developers。
Let more developers benefit from it。
Help developers share knowledge through the Internet。
Follow us


 Español
 Português